

There is something so charming about old-fashioned Easter candy made right at home, and these Vintage Homemade Easter Eggs bring that sweet nostalgia to life in the most delicious way. With their creamy coconut filling, smooth chocolate shell, and pretty hand-dipped finish, they feel like the kind of holiday treat that belongs on a lace-lined platter beside a spring centerpiece.

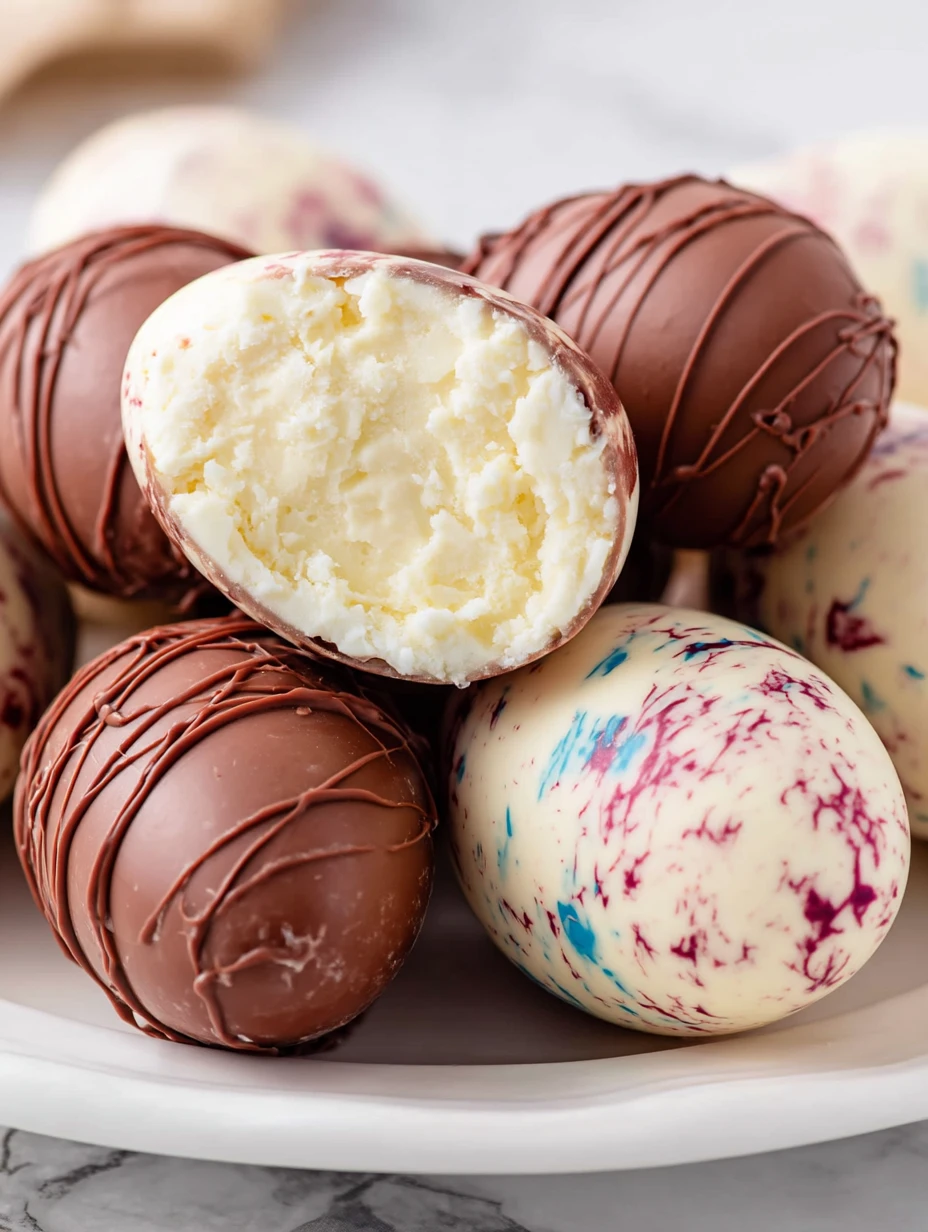
What I love most is how special they look without being difficult to make. The centers are soft, rich, and full of classic flavor, while the chocolate coating gives each egg that unmistakable candy-shop look. They are perfect for Easter baskets, dessert trays, or wrapping up as thoughtful homemade gifts for family and friends.
Why You’ll Love This Vintage Homemade Easter Eggs
These Easter eggs are pure holiday comfort in candy form. They have that creamy, melt-in-your-mouth center that feels rich without being overly complicated, and the chocolate coating adds just the right snap when you bite in.
They are also great for making ahead, which is a huge help during busy holiday weekends. You can prepare them in advance, keep them chilled, and have a beautiful homemade dessert ready whenever guests stop by. They also look lovely decorated with a drizzle of chocolate or a light sprinkle of festive toppings.
What Gives Vintage Homemade Easter Eggs Their Old-Fashioned Charm?
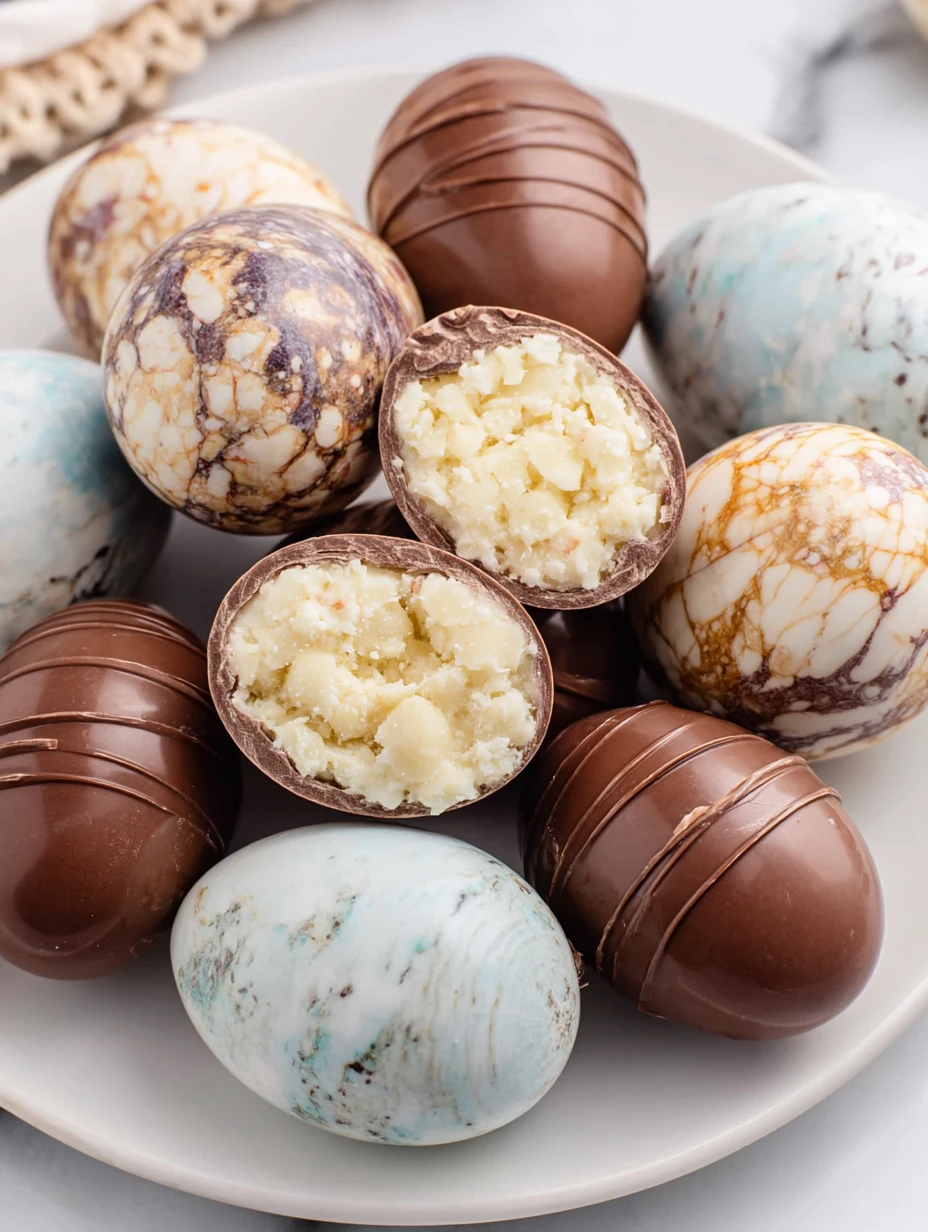
The magic is in the texture and the simplicity. Traditional homemade Easter eggs usually feature a sweet cream cheese and coconut filling shaped by hand, then dipped in melted chocolate for a candy-store finish. That combination creates a treat that feels both homemade and timeless.
Another part of their vintage charm is how customizable they are. Some families add chopped nuts, tint the filling in soft pastel colors, or flavor each batch a little differently. No matter how you decorate them, they always carry that classic homemade Easter feeling.
Ingredients for the Vintage Homemade Easter Eggs
Every ingredient in these Easter eggs has a purpose, and together they create that soft, rich filling and glossy chocolate shell everyone loves.
Cream cheese gives the filling its smooth, tangy base and keeps the center creamy instead of dry.
Butter adds richness and helps the filling feel soft and luscious.
Vanilla extract brings warm sweetness that rounds out the flavor beautifully.
Powdered sugar sweetens the filling while helping it hold its shape when molded into eggs.
Shredded coconut gives the centers their signature texture and that classic old-fashioned candy feel.
Milk chocolate chips or melting chocolate create the sweet outer shell that makes these candies look polished and festive.
A little coconut oil or shortening helps thin the chocolate just enough for smoother dipping.
How To Make the Vintage Homemade Easter Eggs
Making these Easter eggs is simple and fun, especially once you see how easily the filling comes together. A little chilling time helps everything firm up so dipping is much easier.
Step 1: Make the Creamy Filling
Beat the cream cheese and butter together until the mixture is smooth and fluffy. Mix in the vanilla, then gradually add the powdered sugar until a thick filling starts to form. Stir in the shredded coconut so every bite has that classic texture.
Step 2: Chill the Mixture
Cover the filling and place it in the refrigerator until it is firm enough to handle. This step makes shaping much easier and helps the eggs hold their form.
Step 3: Shape the Eggs
Scoop portions of the filling and roll them gently with your hands, then shape each one into a small egg. Set them on a parchment-lined tray and chill again until very firm.
Step 4: Melt the Chocolate
Melt the chocolate with a little coconut oil or shortening until smooth and glossy. Stir well so the coating is fluid enough for dipping but not too thin.
Step 5: Dip and Decorate
Using a fork or dipping tool, coat each chilled egg in melted chocolate and let the excess drip off. Place them back on the tray and add a drizzle of extra chocolate if you want a decorative finish.
Step 6: Let Them Set
Refrigerate the dipped eggs until the chocolate is firm. Once set, they are ready to serve or package for gifting.
How to Serve and Store Vintage Homemade Easter Eggs
These homemade Easter eggs are perfect for serving on a spring dessert tray, tucking into Easter baskets, or arranging in little candy boxes for gifting. This recipe feeds about 18 people, depending on how large you shape the eggs and how many other desserts are on the table.
To store them, keep the eggs in an airtight container in the refrigerator. They stay fresh for several days and actually taste even better once the centers have had time to firm up. If you want to make them further ahead, you can freeze them in layers separated by parchment paper and thaw them in the fridge before serving.
What to Serve With Vintage Homemade Easter Eggs
Fresh Strawberries
The bright, juicy flavor of fresh strawberries balances the richness of the creamy filling and chocolate shell.
Hot Coffee
A warm cup of coffee pairs beautifully with the sweetness of these candy eggs and makes them feel even more special after dinner.
Easter Brunch Pastries
Serve them alongside cinnamon rolls, sweet breads, or fruit danishes for a festive holiday spread.
Vanilla Ice Cream
A scoop of vanilla ice cream turns these chocolate eggs into an easy plated dessert that feels extra indulgent.
Mixed Berry Fruit Salad
A light fruit salad adds freshness and color, which works so well next to a rich homemade candy.
Want More Easter Dessert Ideas?
If you love these Vintage Homemade Easter Eggs, you’ll probably enjoy these other sweet favorites:
- Easy Cheesecake Cups for a creamy no-fuss dessert that is always party friendly.
- Lemon Raspberry Swirl Cheesecake Cups when you want something bright, fruity, and elegant.
- Cherry Chocolate Cheesecake for another rich chocolate dessert with a beautiful holiday feel.
- Paula Deen’s 5-Minute Fudge if you are in the mood for another easy homemade candy.
Save This Pin For Later
📌 Save this Vintage Homemade Easter Eggs recipe to your Pinterest dessert board so you can come back to it any time.
And let me know in the comments how yours turned out. Did you keep them classic with coconut, or did you add a little twist with nuts or extra flavoring? I always love seeing how a traditional holiday favorite becomes part of someone else’s celebration.
For even more beautiful homemade sweets and seasonal inspiration, explore more recipe ideas on Nora Nosh Recipes on Pinterest.
Vintage Homemade Easter Eggs
- Total Time: 30 minutes plus chilling
- Yield: 18 eggs
- Diet: Vegetarian
Description
These Vintage Homemade Easter Eggs are the kind of nostalgic treat that instantly makes Easter feel more special. With a rich cream cheese and coconut filling tucked inside a smooth chocolate shell, they deliver that classic homemade candy-shop flavor in every bite. Perfect for spring gatherings, Easter dessert tables, edible gifts, and make-ahead holiday prep, this easy recipe is a wonderful choice when you need fun dessert ideas, homemade candy, sweet snack ideas, and festive food ideas everyone will love.
Ingredients
8 oz cream cheese, softened
4 tbsp unsalted butter, softened
1 tsp vanilla extract
4 cups powdered sugar
3 cups sweetened shredded coconut
12 oz milk chocolate chips
1 tbsp coconut oil
Instructions
1. Beat the softened cream cheese and butter in a large bowl until completely smooth and fluffy.
2. Mix in the vanilla extract.
3. Add the powdered sugar gradually, mixing until a thick dough-like filling forms.
4. Stir in the shredded coconut until evenly combined.
5. Cover the bowl and refrigerate the mixture for 30 minutes so it is easier to shape.
6. Scoop portions of the filling and shape them into egg forms with your hands.
7. Place the shaped eggs on a parchment-lined tray and chill for another 30 to 45 minutes until firm.
8. Melt the milk chocolate chips with the coconut oil in short intervals, stirring until smooth.
9. Dip each chilled egg into the melted chocolate, letting the excess drip off.
10. Return the coated eggs to the parchment-lined tray.
11. Drizzle with extra chocolate if desired for decoration.
12. Refrigerate until the chocolate is fully set, then serve or store chilled.
Notes
Do not skip the chilling steps, because warm filling will be too soft to shape and can fall apart when dipped in melted chocolate.
- Prep Time: 25 minutes
- Cook Time: 5 minutes
- Category: Dessert
- Method: No-Bake
- Cuisine: American
Nutrition
- Serving Size: 1 egg
- Calories: 245
- Sugar: 26g
- Sodium: 65mg
- Fat: 12g
- Saturated Fat: 8g
- Unsaturated Fat: 3g
- Trans Fat: 0g
- Carbohydrates: 34g
- Fiber: 1g
- Protein: 2g
- Cholesterol: 18mg